Thursday 16 June 2011

Tips for Better Panning Shots

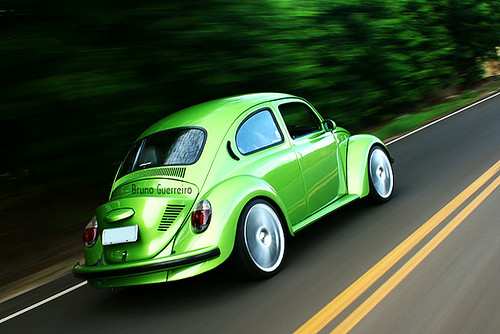
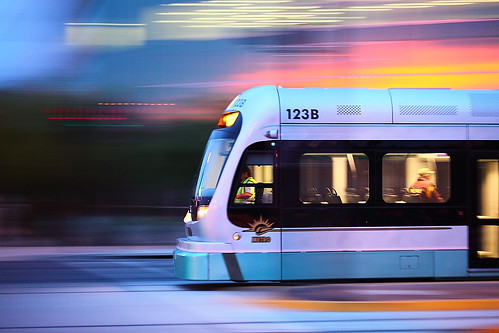
Panning is an interesting technique in photography for showing the feel of motion by freezing a moving subject while adding motion blur to the background. It is particularly very useful when you are capturing fast moving subjects. The basic of this technique is pretty straight forward. What you need to do is to capture the moving subject in your frame as it comes towards you by swing/pan the camera from left to right (or vice versa) as it follows the subject.

Camera Setting

You’ll need to put your camera on ‘shutter priority’ mode (Tv or S) so you can set the shutter speed manually and let the camera automatically set the aperture for us. Since you will need your camera to focus on the moving subject so the best way to do this is by set your camera on ‘Focus Tracking’ mode. Canon calls this AIServo and others may call it C/ContinousFocus


Shutter Speed Setting

The shutter speed setting for your panning shots depends on how fast your moving subject is. For example, when you’re shooting a racing car, the best shutter speed setting is at 1/320. You can set the shutter at 1/60 for shooting pro cycling and 1/30 for shooting a marathon runner. For beginners, you might want to start by choosing the faster speed (1/60 and faster) to eliminate the vertical camera shake.


Fusca - p/ Revista Maxi Tuning

Panning Movement

To get successful panning shots you need to keep your camera as smooth and horizontal as possible while you pan/swing the camera. Use your feet as a rotating point and try to swing your camera with your upper torso, not just your head and your camera. Don’t forget to press the shutter button smoothly to avoid camera shake when the subject is right in front of you. 


Phoenix Light Rail Sun Rise!

Tripod/Monopod vs Image Stabilized Lens

You can use tripod or monopod to help you to get more fluid motion when swinging your camera. When you choose to use a tripod you can use the pan-tilt head as it has separate axes and controls for tilting and panning, so that a certain axis can be controlled without risk of affecting the other axes. However, if you own an Image Stabilized lens with panning mode, I would not recommend you to use a tripod as it can hinder you while swinging from one side to the other. Your image stabilized lens with a mode 2 IS is much better equipment to help you eliminate the vertical shake.

Friday 10 June 2011

Learn Tips & Tricks From Digital Photography Classes

When you first get your digital camera, it’s a lot of fun trying to figure things out, but after a while, you just want the information that you’re looking for, without trying to figure it all out by yourself. One way to do this is by finding good digital photography classes to help you.
http://www.geeky-gadgets.com/wp-content/uploads/2009/10/DIY-Camera-Hand-Strap_2.jpgSome people, especially those who have been using film cameras for years, think that because they’re experts at their old camera, picking up a digital camera will be a piece of cake. Unfortunately, that’s not the case as digital cameras are in many ways very different from film cameras. Not only do they’ve a lot more features, buttons, and settings, but once you download your pictures to your computer, you then have to figure out what to do with them. Digital photography classes can help you with both aspects of the art of photography.
There are many good photography tip books at your local bookstore, but they’re often just a little bit out of date. The technology involved in digital photography is still changing very quickly, and even if the book was published in the last few years, it’s likely that it’ll seem somewhat old-fashioned by the time you get your hands on it.
Usually, the best place to go for photography information, hints, and tricks is to go online. You could even take digital photography classes that will teach you everything you need to know, from what all those buttons are for, to how to manipulate the images once you get them on your computer. A good online resource can really help you get a lot more out of your camera and produce better pictures.

Wednesday 8 June 2011

5 Tips for Photographing Large People

The first thing to acknowledge here is that large people know that they’re large. As with any body type (skinny included) their body image may cause them to believe that they’re either larger or smaller than they are. You can tastefully discuss body image with them clients which is something I may be inclined to do with any type of person. Understanding how a client feels about their body is always a great thing to know. And if they’ve scheduled a photo session, they’re probably already pretty confident people.
As a society, we try to find ways to make people look smaller and we think that smaller = more attractive, but this doesn’t need to be our primary focus when shooting large people. Making them appear comfortable? Now that’s important. And I agree, laying on the ground is usually a no-go. Here are a few tips I’ve found helpful:

1. Use a telephoto lens or the longest zoom that you have. This will compress the shot and keep it from suffering from widening distortion. Experiment with the distortion correction in Photoshop to see if there’s any barreling that you don’t notice on first inspection. 

2. Don’t shoot from a low angle.

3. You can shoot from higher up looking down, but beware that this is a way overused tactic for photographing larger people so throw in lots of other types of framing, not just this one.

4. You can use one subject’s body to shield another (if one is lighter than the other)

5. Obviously, you have the option of not photographing their whole body. Try different varieties of head-and-shoulders shots, but beware that they may feel that you’re saying that they’re unattractive if you don’t also provide them with body shots. Your job is to photograph them like you would anyone else so don’t think you’re doing them a favour by completely ignoring their entire body.

10 Food Photography Tips to Make It Look Tasty

1.. Keep the background clean

Make sure there is a color contrast between the background and the food, don’t have the two be the same color or a similar shade. For example, strawberries served on a red plate isn’t going to stand out. Keep the background simple and uncluttered. If unsure, stick to a plain white background.

2.. Adjust the white balance

Adjust the white balance on your camera according to what you’re shooting. Meat should always be shot in warm tones as a blue-ish tinge under some fluorescent lights would make it look ghastly.

3.. Use natural lighting

Whenever you can, try to shoot using natural lighting. Shoot during the day near a window where you would get plenty of natural sunlight. When you must shoot at night, try avoid using flash directly on the food as it’s too harsh. Instead, use a flash diffuser or have the flash bounce off a ceiling or wall.

4.. Use a tripod

Most food photography will be done indoors, where there might not be enough lighting. Use a tripod whenever you can as it beats trying to hold very still for long a amount of time.

5.. Small details make a big difference

Don’t disregard the small stuff. Keep in mind that using nice cutlery and a clean serving plate/bowl could make all the difference transforming a nice photo to a fantastic one.

6.. Get up close

Instead of only taking photos of a full plate of food, take some macro shots too.  Getting up close to your subject will bring out the textures and finer details, making it more interesting and intriguing.

7.. Cut it, slice it, dice it!

As with anything, you shouldn’t just take something for its face value. With food, sometimes it’s what’s inside that can create a great shot. I love cutting up crumbed foods for the contrasting textures. I also love cutting up cakes just so I can get the different layers.

8.. Take photos from all angles

Don’t just take a photo from a bird’s eye view, try different angles. Left, right, top, bottom. Feel free to even move the food around and come up with different compositions.

9.. Use props

Don’t be afraid to jazz up the set. Maybe a glass of orange juice to go with those pancakes? A bottle of wine in the background with your steak and mash meal? Or maybe some hundreds and thousands sprinkled around your cupcakes? Do remember to keep it simple as too many props can be distracting.

10.. Cheat if you have to

As long as you’re not planning to eat the food afterwards, there are ways to enhance your food by using some industry tricks. For example, make your food glisten by brushing on some vegetable oil. Create that ‘fresh out of the oven’ steam by placing some microwaved cotton balls that have been soaked in water. Or make perfect-looking ice cream that won’t ever melt with some mashed potatoes.